Vlog Editing: What Separates a "Pro" from an "Amateur" (feat. White Balance)
These days, all you need to do is drop in your travel footage, and an AI-powered auto-editing tool like Heimlog will add captions, cut the clips together, and turn out a finished vlog for you. Editing time and effort have genuinely dropped.
But no matter how skillfully Heimlog trims and stitches your cuts together, if the color tone shifts from location to location in your raw footage, the overall quality of the video still looks off.
If you actually want to become a detail-obsessed "pro vlogger," it's not enough to hand editing over to AI — you also need the basic skill of controlling white balance yourself at the shooting stage.
1. Why does "color collapse" happen?
Heimlog is a great tool for cutting and assembling video files, but it can't restore or fix the color of footage that's already been shot. This is especially true if you're shooting on a smartphone or camera left on Auto White Balance (AWB) while you move around — you'll typically run into:
- Colors that jump from cut to cut: Moving from outdoors, to a café, to a night scene breaks the tone-and-manner continuity between cuts, making the video feel disjointed.
- Limits on how much correction can fix: Even if an AI editing app or color tool applies a filter on top, if the original white balance is set to an extreme value — like 2,000K or 10,000K — the footage ends up noisy or with muddy, degraded color.
Bottom line: the more consistent your raw footage's color is, the more natural and high-quality the video Heimlog produces will look.
2. Three K-value presets you can use on location
Because vlog shoots typically move back and forth between outdoor and indoor settings, it's worth building the habit of manually setting a Kelvin (K) value for each environment instead of relying on Auto White Balance (AWB). Pick whichever of these three K-value presets fits your scene.
| Shooting location | Recommended K (Kelvin) | On-location tip |
|---|---|---|
| Clear-day outdoors / streets / beach | 5,500K–5,600K | Gives a standard, natural color balance under daylight. (Push it to 6,000K+ if you want to emphasize sunset tones.) |
| Indoors / cozy cafés / restaurants | 4,300K | Keeps skin tones and food from turning overly yellow even under warm café lighting. |
| Night scenes / street lighting / venues | 3,200K | Creates a calm, refined look under orange streetlights or strong nighttime lighting. |
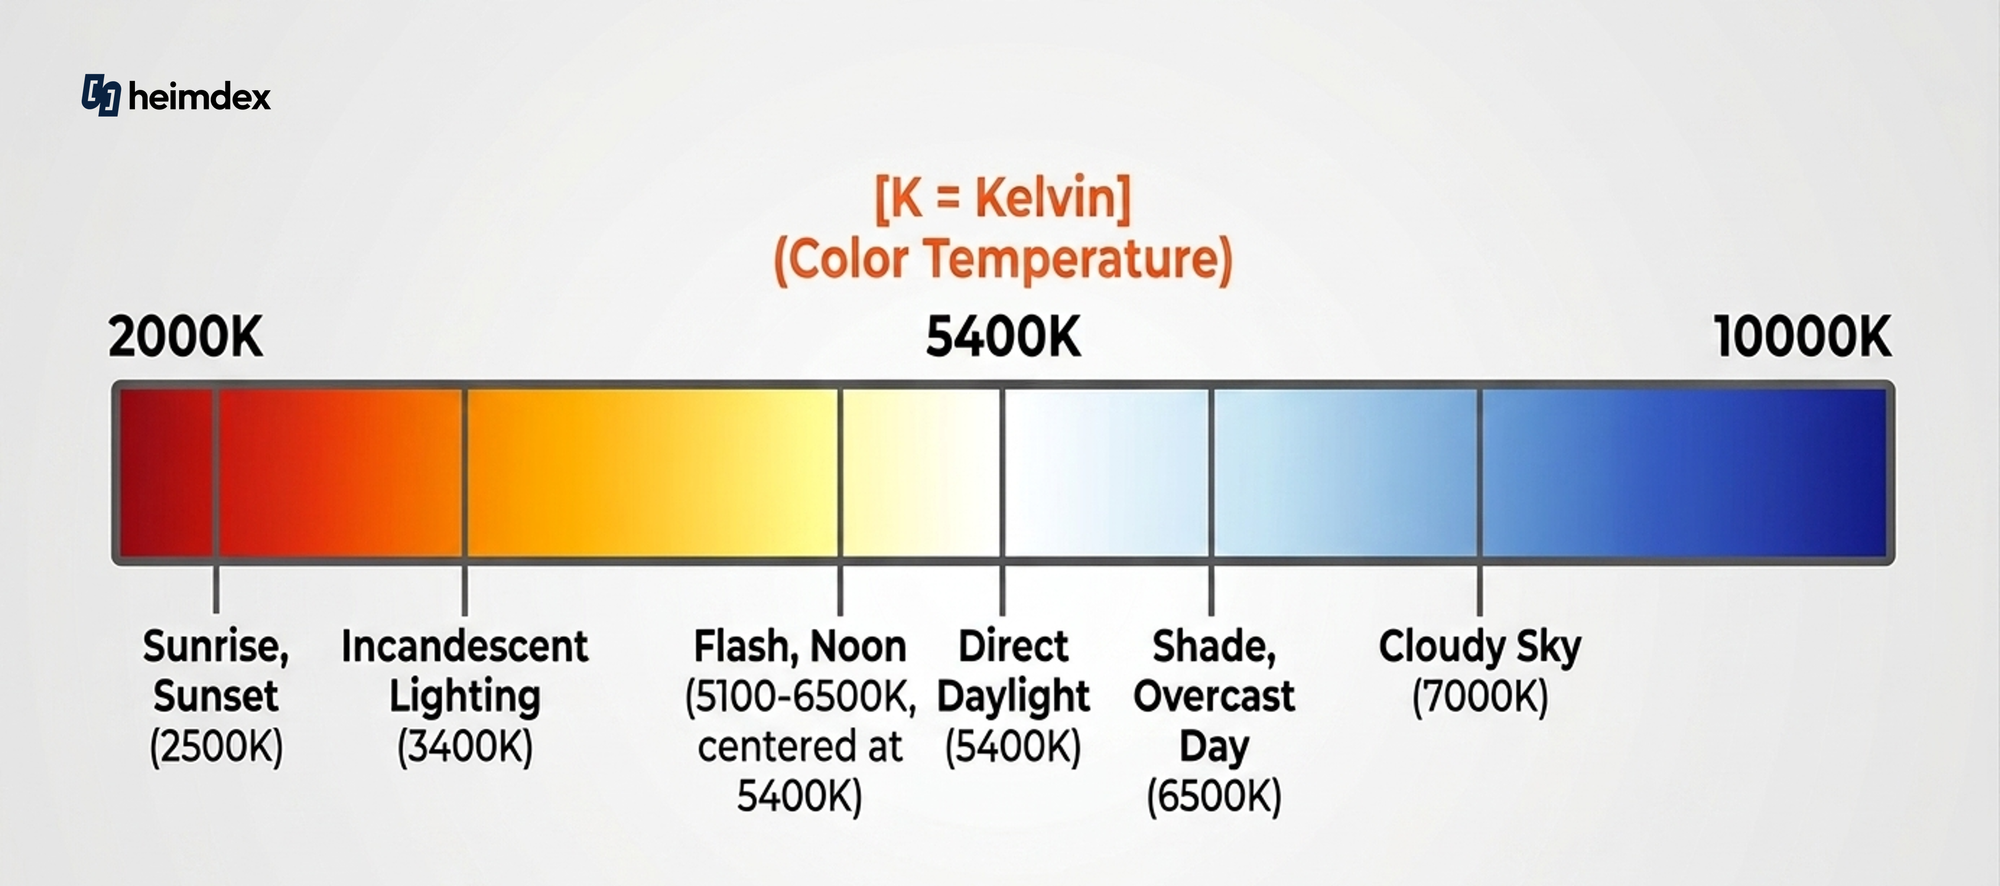
- Raising the K value (5,500K → 6,500K): Adds a red/warm tint to the image (an orange-lighting effect).
- Lowering the K value (5,500K → 3,200K): Adds a blue/cool tint to the image (a crisp "midnight" effect).
Key checkpoints:
- 5,500K (standard daylight baseline): The color balance closest to what your eyes actually see in real conditions
- 4,300K: Café settings and soft indoor lighting
- 3,200K: Prevents color distortion under strong orange streetlights or indoor tungsten lighting
💡 The pro vlogger's routine for getting 200% out of Heimlog
- While shooting: Whenever the location changes, check and manually lock in the K value before you shoot.
- While editing: Upload your footage to Heimlog and let it handle cutting, captions, and a background music layout in about 30 minutes.
- To finish: Since your color is now consistent throughout, just add your own signature tone filter on top of the finished, high-quality footage.
Let Heimlog take the heavy lifting off your editing workload — and add the small but crucial detail of manually setting white balance while you shoot — to make a vlog that stands out from everyone else's.
✔️ Heimlog's core features
- Drop in your raw footage and it's automatically sorted by time
- A rough cut is generated to match your preferred style (choose chronological highlights OR theme-based editing)
- Add your own finishing touches and export — done!
Heimlog is currently offering free credits to everyone for up to 2 vlogs. Pre-register now and don't miss the chance to try the free auto-editing vlog tool.