


Travel Vlog Editing Tips + The Trends Blowing Up Right Now
Fifty gigabytes of raw footage… where do you even start?
"This trip is definitely vlog material," you told yourself, camera in hand the whole time. But now your gallery is packed and you haven't touched a single clip, right?
Staring down dozens — sometimes hundreds — of video clips is exhausting before you've even opened your editor. This guide is for anyone whose travel footage has been sitting untouched, badly in need of a second life.
We'll walk through a step-by-step editing process that turns a pile of raw footage into a finished video, plus the secrets behind the kind of travel vlogs that actually stop people mid-scroll. No more putting it off — finish your own travel video this weekend.
The 4-Step Travel Vlog Editing Process
A four-step process that keeps you from freezing up in front of tens of gigabytes of footage.
Step 1: Organize files & sort your B-roll
Dumping every clip straight into your editing software will slow down your computer and your motivation at the same time.
- Folder by date and location: Use a clear naming system like
01_Day1_Airport,02_Day1_Hotel. - First pass of cuts: Delete shaky clips, footage pointed at the ground, and duplicate takes before they ever reach your timeline.
- Mark your highlights: Set aside 5–10 clips that best capture the trip's mood — these become your intro and highlight reel.
Step 2: The rough cut — building your story's skeleton
This is the most time-consuming stage. Don't get hung up on perfect details yet — focus on connecting clips in chronological order.
- Cut boldly: Trim transit scenes, long meal shots, and anything else that risks dragging, down to the essentials.
- The 3-second rule: Scenery or insert shots without dialogue should run 2–3 seconds max to keep the pacing alive.
Step 3: Sound & BGM — setting the mood
Sound drives about 80% of a vlog's emotional feel.
- Match tempo to music: Lofi or acoustic for a quiet trip, upbeat pop for a lively backpacking adventure.
- Sync cuts to the beat: Timing your scene transitions to the music's beat instantly makes the edit feel more polished.
- Balance dialogue and music: Lower the BGM volume so ambient sound and voice don't get buried.
Step 4: Captions & sound effects — delivering the message
Time for the finishing touches that pull viewers in.
- Choose a caption style: Rather than transcribing every word ("full captions"), summary-style captions — capturing a feeling or useful info like location and price — read much easier.
- Accent sound effects: A light, understated pop or whoosh on transitions or caption pop-ins goes a long way toward a more professional feel.
What Makes Today's Top Travel Vlogs Work
(from an editor who's studied 50+ travel vlogs)
When you hit a wall editing, nothing beats studying well-made reference videos. Here are three patterns that show up again and again.
1. Two intro patterns that hook viewers
Travel vlog intros generally fall into two styles:
- Highlight-reel intro (recommended): Compress the video's most emotional or entertaining moments into a sub-30-second opener.
- Direct-address intro: Open energetically, speaking to the camera with a greeting or a quick intro to the destination.
If you're comfortable on camera and can deliver a clean opening line, the direct-address style works great. But if talking to yourself on camera outdoors still feels awkward, a highlight-reel intro — stitched from pretty scenery and fun moments — is the safer, still-effective choice.
Highlight-reel intro
Direct-address intro
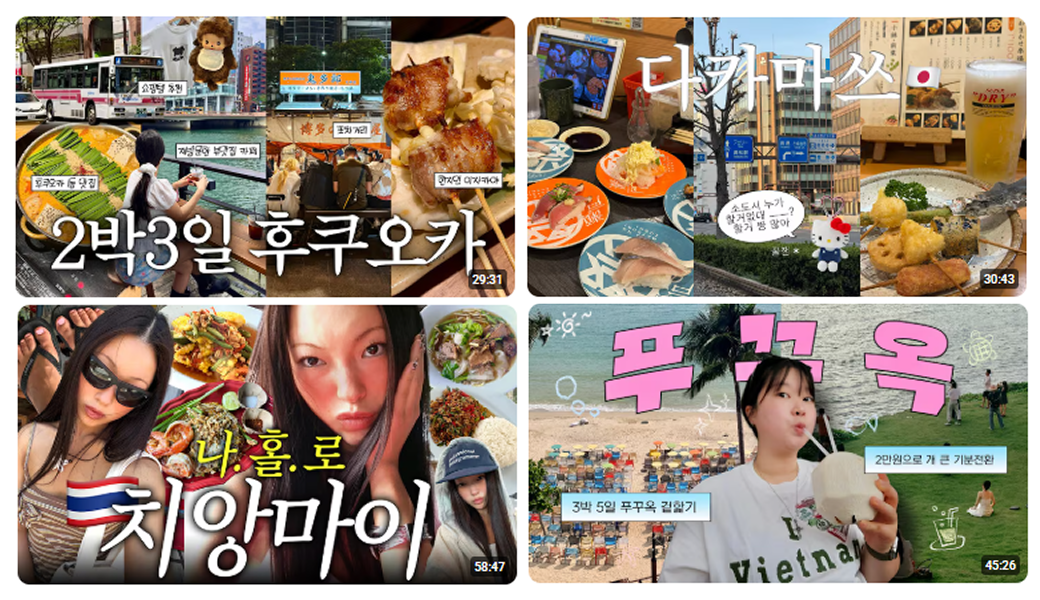
2. Thumbnail design that earns the click
A few trends show up consistently in today's high-performing thumbnails:
- Bold, direct titles: A large, stylish destination name (TOKYO, PARIS) beats a wordy explanation.
- Sticker accents: Cute graphic stickers or handwritten-style text elements boost visual appeal.
- 3–4 panel layouts: Splitting the thumbnail into several panels — scenery, food, people — showcases more of the trip's variety than a single photo can.
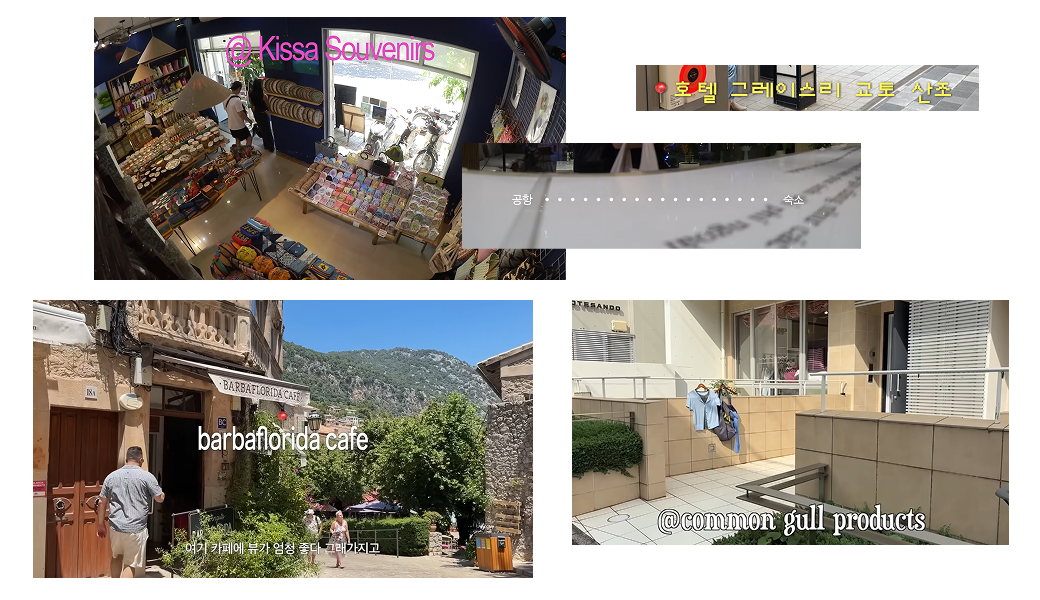
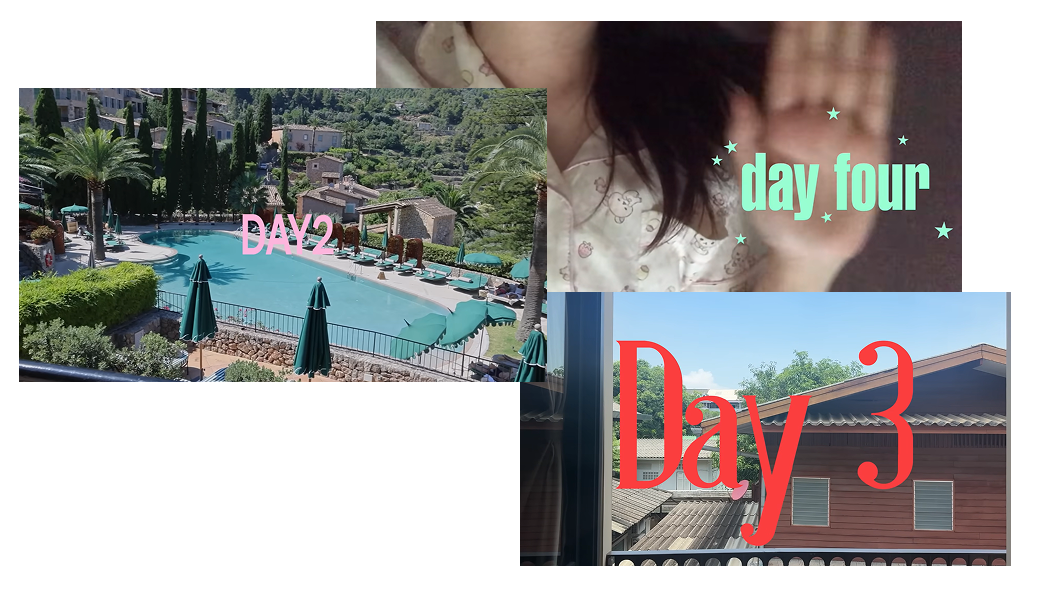
3. The location & date caption template
Telling viewers when and where a clip was shot isn't optional in a travel vlog — it's essential. Keep the design simple: placed where it's instantly readable, without overcomplicating the layout.
- location
- date
Zero Editing Stress: Heimlog, an AI Travel Vlog Auto-Editor, Is Coming Soon
For anyone who reads all of the above and thinks "sorting files and cutting clips is still too much work" — Heimdex is introducing Heimlog, an AI-powered vlog editing solution.
No more manually sorting and stitching through tens of gigabytes of footage — just upload your raw clips and Heimlog builds the video for you.
- Automatic highlight extraction: Identifies people, scenery, and key moments on its own, then selects and sequences the best clips in chronological order.
- Theme-based scene selection: Build a video around a specific focus — food, shopping, sightseeing — if that's what you want to highlight.
- Voice-based auto-captioning: Recognizes spoken audio and generates accurately timed captions — no manual typing required.
- One-click BGM & sound effects: Add music and sound effects that fit your video's mood in a single click.
No more "I shot the footage but never had time to edit it." With Heimlog, you upload your raw clips — and your travel vlog is ready.
🎁 [Heimdex 'Heimlog' Pre-Registration Event]
Pre-register now to receive free vlog creation credits!
- Go to the pre-registration page.
- Fill out the application form.
- Get 70 credits upon beta launch!